French drains are an important asset to properties that suffer from standing water in their basement or excess water that sits up against the foundation of their house. These drains go in the ground and move the excess water to another area without coming in contact with important structures. Due to their slopped and pre-mapped routing, water gets carried away effortlessly to a designated place away from important parts of the property.
With french drains, many homeowners avoid damage and instability to their foundations, water damage, flooding, and mold that’s commonly seen in homes without french drains. For those looking to install french drains to protect their homes or property, it’s a fairly easy process that most people can do without the help of a professional. In fact, this guide offers detailed instructions on french drain installation, allowing homeowners to protect their homes in just a few short hours.
How to Install French Drains
Before any work can begin, a drainage route must get mapped out to make sure the water gets carried away from the structure. This route should have a downward slope to ensure water gets carried away and doesn’t sit inside the drain. In addition, it’s important to make sure the route has no obstacles in the way during the installation or drainage process. Avoid areas that have fences, posts, structures, or trees. Once the routing area’s mapped out, its time to begin the installation process.
Digging The Trench
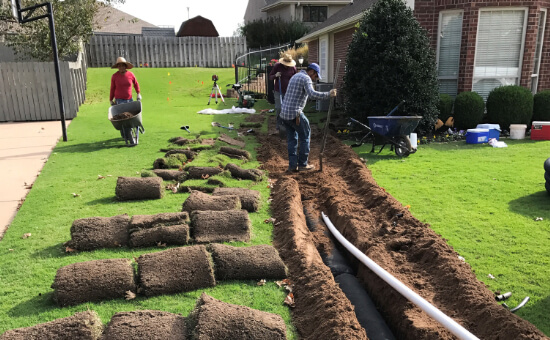
After finding the routing path, its time to dig a trench along this route along the outside footing of a structure. If the structure is a slab-based structure, the trench must run at least 2-feet deep and 2-feet wide, and for a basement, the trench must run 6-feet deep and 2-feet wide. It’s important that the trench reaches the same depth as the structures existing foundation. Move the excess dirt off to the side for the end of the installation process. Once the trench is complete, it’s time to move on to the next step.
Laying Down The Materials
Once the trench is dug, it’s time to lay down the materials. Begin by putting several inches of gravel in the trench creating a stable base for your drain. Make sure the entire trench has an even layer of gravel running throughout to avoid dips and bulges when laying down the drain. Next, place landscaping fabric over the gravel along the entire trench. Make sure there’s enough excess fabric along both sides to wrap the drain towards the end of the installation.
Now that the fabric covers the gravel, it’s time to lay down the pipe. The most popular piping options for french drain installation include perforated and slotted piping. Regardless of the type of piping used, the installation remains the same. Lay the pipe down on top of the fabric layer down the entire trench. Now cover the top of the piping with gravel until the gravel is 5-inches away from ground level, and then take the excess fabric and wrap it around the gravel. This will cover the gravel creating a blanket that wraps around the materials currently in place.
Lastly, cover the fabric and other materials with a thin layer of sand and then an extra layer of soil. Finish up the trench by taking the leftover dirt removed to place the piping and fill in the entire trench. Where the ends of the drain come out of the trench, place a bed of loose gravel to help filter the water through to the soil and prevent it from pooling.